Getting started Product Tour Question Bank Question Types Test Editor Grading and Evaluation Lockdown Browser Online Proctoring
Organization management Setting Up Your Organization General Settings Configuring Consent Process Branding Plans & Credits Understanding Subscription Plans Managing Credits Changing Subscription Plans Billing Settings Credit Notifications Users and Collaboration Roles and Permissions Adding New Users & Assigning Roles Importing Users Organizing Users into Teams Advanced Permissions & Access Control User Login Controls Monetization
Question Bank Creating a Question Adding Image Adding Audio Adding Video Adding File Editing Layout Adding Feedback Adding Hint Math Input Importing Questions Question Reporting Scoring Question Types Multiple Choice Questions Matching Questions Text-Based Questions Rich Content Questions Numeric Questions Coding Questions Audio Recording Video Recording Photo Capture File Upload Fill-in-a-Table Questions Organizing Questions Folders and tags Batch update Schema Browsing Questions Exporting Questions Presets Composites
Tests (deprecated) Creating a Test Pages Sections Adding Questions Previewing Test Setting Profile Test Type Test Navigation Time-Limits Auto Numberings Mandatory Question Security Shuffling Deprecated Customize Section Weights Randomization Reporting
Tests Creating a New Test Test Settings Quick Exam Creation Creating Randomized Tests Adding Questions Sections Automatic Question Exclusion Shuffling Pages Time Limit Navigation Control Section Introduction Page Structure Shuffle Questions Time Limit Layout
Organization management Setting Up Your Organization

Branding

Branding settings allow you to personalize your organization's visual identity, ensuring a consistent and professional appearance across all user interactions.

Updated 2026/02/24

Branding settings allow you to personalize your organization's visual identity, ensuring a consistent and professional appearance across all user interactions. These settings help maintain brand consistency by applying your preferred fonts, colors, and logo to the platform.

Overview

By customizing branding settings, you can:

  • Establish a unique visual identity for your organization
    • Ensure consistent branding across internal and external users
      • Enhance user experience with customized fonts, colors, and logos
        • Create a more professional and trustworthy appearance for your test-takers and teammates


          Each of these elements is explained in detail in the following sections.

          Branding Menu Overview

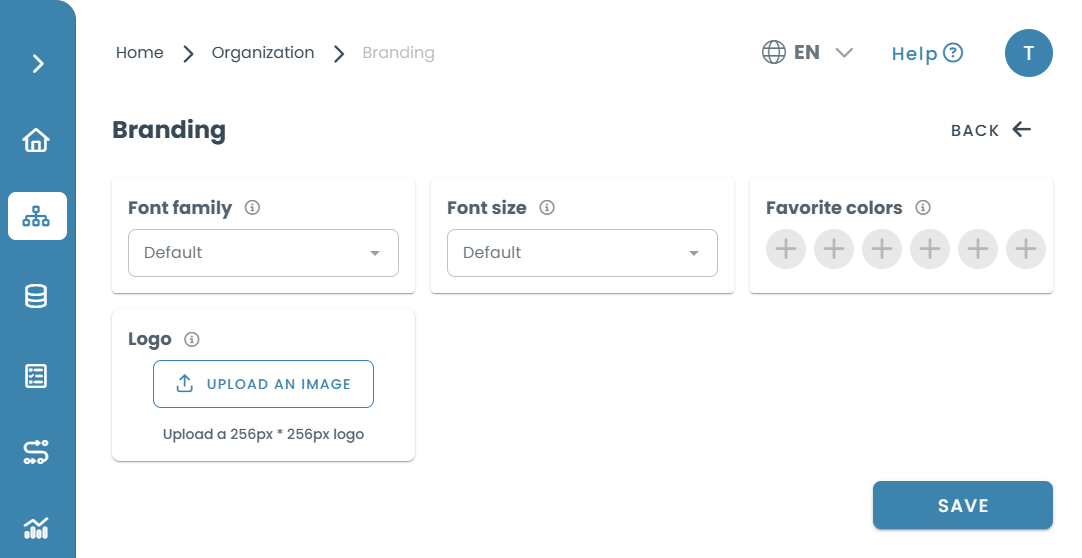
          The Branding settings are located within the Organization > Branding menu. Here, you can define your organization's font, font size, color theme and logo.

          Customizable Branding Elements

          Font Family

          The font style you choose will be used throughout your organization’s platform. Selecting an appropriate font can help reinforce your brand identity and improve readability.


          How to change the font family:

          1. Click on the Font Family dropdown.
            1. Select a font that best represents your brand.
              1. Click Save to apply the changes.

                Font Size

                This setting controls the default text size across your organization’s interface. Choosing the right font size ensures readability and enhances accessibility.

                How to adjust the font size:

                1. Click on the Font Size dropdown.
                  1. Select the preferred text size.
                    1. Click Save to confirm.

                      Favorite Colors

                      You can define a color palette that reflects your organization’s visual identity. These colors will be used throughout the system, ensuring a consistent and cohesive look.

                      How to set favorite colors:

                      1. Click on the Add (+) button under the Favorite Colors section.
                        1. Use the color picker to select a shade or enter a HEX, RGB, or HSL color code.
                          1. Click Save to confirm your selection.

                            Logo

                            Your organization’s logo is a key branding element visible to your teammates and test-takers. Uploading a logo ensures a professional and recognizable presence.

                            How to upload a logo:

                            1. Click Upload an Image in the Logo section.
                              1. Select a 256x256px image from your device.
                                1. Adjust the cropping if necessary.
                                  1. Click Save to finalize the upload.
                                    Best Practices & Tips

                                    ✅ Choose a legible font that aligns with your organization’s brand identity.
                                    ✅ Ensure the logo is high-quality and fits the 256x256px requirement.
                                    ✅ Use consistent colors across all branding elements to enhance recognition.
                                    ✅ Regularly update branding settings if your organization undergoes a rebranding.

                                    Frequently Asked Questions (FAQ)

                                    Yes! You can update fonts, colors, and the logo at any time from the Branding menu.

                                    The system will use a default placeholder image instead of a custom logo.

                                    No, only the predefined font families are available for selection.

                                    You can select up to six favorite colors.