Batch user management

Learn how to manage users using JSON files.

Created by Batuhan Özgü

Navigation to the Import Users

  1. Click Organization.
    1. Select Users.
      1. Click on the red circle with the + icon.
        1. On the popup menu, click on the Import Users button. Click on the Select File button and select the JSON file you prepared to import,update or export Users in bulk with JSON.
          This process is for the IT personnel who works with JSON files. If you have no prior experience with JSON file format, please refer to your IT department or contact us.

          Importing users


          Below is a sample JSON file that you can use as an example to create your own.

          Creating a user in JSON.
          Creating a user in JSON.

          Download file

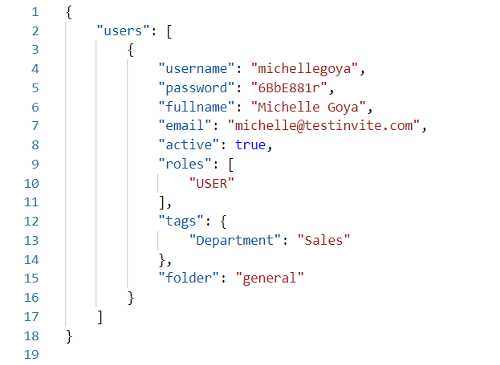
          The above example is used to create a single User. You can inspect the JSON file to create your own.

          You can use these JSON properties:

          usernameUser’s username
          passwordUser’s password
          fullnameUser’s full name
          emailUser’s contact e-mail address (to send invitation e-mails)
          folderName of the folder that the user will be placed.
          activeActive/passive status of the User
          true (user is active can log in)
          false (user is not active cannot log in.)
          roles User’s role in your Organization. A User can have multiple Roles.
          USER (Regular User)
          EDITOR (Editor)
          OPERATOR (Operator)
          MANAGER (Manager)
          QUESTION SUBMITTER (Question Submitter)
          QUESTION BANK SUPERVISOR (Question Bank Supervisor)
          Special (Special)
          tagsUser’s Tag Name(s) and Tag Value(s). A User can have multiple Tags.
          Department
          Section
          Group
          Category
          Position
          Class
          Source
          When uploading your custom JSON file, make sure all properties are defined and filled or you will get an error message.

          Updating users

          ID Properties

          To update Users’ information in bulk with a JSON file, you need to know the ID of the Users you want to update. You can't update the User information without their ID information. .

          You need to format your JSON file to delete/update Users in bulk.

          • id: whenever you create a new User and ID value is created for that user.
            • You need to enter this information to update the User info.
              • To learn the specific ID of a User, you need to export the Users info as a JSON file first.

              Deleting users

                While updating Users in bulk, you can also delete and add new Users. To delete a user, you need to add the ''deleted'' property to that user and set it to true.

              • deleted: to delete the account
                • true (yes, delete)

                Exporting users

                1. Select the Users you want to export from the Users list.
                  1. Click on Export button on top of the Users List.
                    1. Once you click the button, a JSON file will be created.
                      1. This JSON file is ready to be uploaded back to the system for importing.
                      2. You can edit this file by opening it with any text editor.

                        Note: This JSON file has 2 extra properties: deleted and id. These fields are used when you bulk update the Users’ information. 

                        Go Back

                        Start designing online assessments with Testinvite today