The Basics of Testinvite's API

There are some concepts and terminologies that you should be aware of before starting to code the integration. Understanding the overall workflow of Testinvite will make everything clearer for you.

Created by Mustafa Ekim

What is an Organization?

When you sign up for a new account for Testinvite, a new Organization is created.

For most of the API calls, you will be requested to provide an Organization ID

You can find your Organization ID by following the below steps:

  • Log into your account.
    • Click "Organization" on the left-menu.
      Finding your Organization's ID
      Finding your Organization's ID

      What is a Task?

      In Testinvite a Task defines an assessment process. Each Task is a container for one or multiple tests along with all the configuration about how the tests will be conducted.

      When you invite a candidate into your Task, the candidate gets access to the Tests inside your Task. The tests are delivered according to the configuration made inside the Task.

      For most of the API calls, you will be requested to provide a Task ID.

      You can find your Task's ID by following the below steps:

      • Log into your account.
        • Click "Tasks" on the left-menu. You will be presented by your Tasks list.
          • Click on the Task that you would like to learn the ID of. The Task editor will show up.
            • Click on the Settings button (1) at the top of the Task editor.
              • You will see the Task's ID (2) at the right bottom corner.
                Finding a Task's ID
                Finding a Task's ID

                What is a Ticket?

                In order to invite a candidate into your Task, you need to create a Ticket. All tickets created are assigned a unique invitation code by the system automatically. In the most common scenario, the end-user (test-taker) will enter the unique invitation code so that he/she will be granted to access the Tests inside your Task.

                What is a Task link?

                All Tasks in Testinvite are given a Task link. The Task link is constant for a Task. It does not change.

                Task links are public, meaning that anyone having the link can navigate to the link.

                To find your Task's link, navigate to your Task's editor and click on the Settings (1) button at the top

                Finding a Task's link
                Finding a Task's link

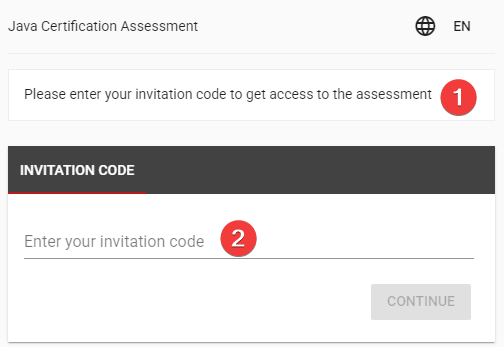
                When somebody navigates to the Task link, he/she faces the Welcome page of the Task. The content (1) inside the Welcome page can be configured inside the Task editor.

                The Welcome page is where the login credentials are asked (2) from the test-taker.

                Welcome page for a Task
                Welcome page for a Task

                What is an Access link?

                If you do not want to bother test-takers with entering their unique invitation code on the Task's Welcome page, you can send them an Access link instead of the Task link.

                An Access link is a combination of the Task link and the unique invitation code of a Ticket. You can find a Ticket's Access link by following the below steps:

                • Navigate to your Task editor.
                  • Click on the Tickets (1) button at the top.
                    • Find the Ticket by fetching the Tickets by clicking on Next (2)
                      • Click (3) on the menu icon next to the Ticket you would like to get the Access link
                        Finding the Access link of a Ticket
                        Finding the Access link of a Ticket

                        When someone navigates to the Access link, he/she immediately enters into the Task and a new Assessment including all the Tests inside your Task has been created.

                        Access link lets someone access your Task without entering any credentials because the Access link already includes the unique invitation code of the Ticket.

                        What is a Test Session?

                        When a test-takers enters into your Task, he/she is presented with all the Tests inside your Task. When the test-taker starts a Test, a Test session is created.

                        You can find all the Test sessions inside your Task editor by clicking on the Test sessions button at the top. You can browse through all the Test sessions that have been created.

                        Finding all the Test sessions created for a Task
                        Finding all the Test sessions created for a Task

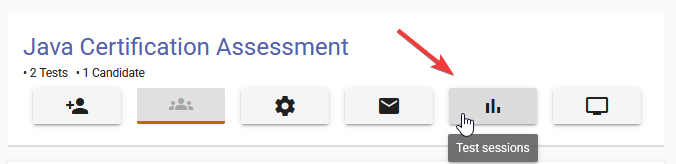
                        Each Test session is automatically assigned a unique Test Session ID. The ID of each Test session is displayed at the Test sessions list.

                        Finding Test session IDs
                        Finding Test session IDs
                        Go Back

                        Start designing online assessments with Testinvite today